1. 프로젝트 생성
(1) Spring Initializr
- 스프링 부트 스타터 사이트에서 스프링 프로젝트 생성
- Gradle Project : 라이브러리를 불러와서 빌드해주는 툴
- Spring Boot 버전: 최신버전 중 정식 릴리즈 버전으로
* SNAPSHOT은 정식버전 x
- adddependencies: 어떤 라이브러리를 땡겨 쓸 것인가
Spring Web
Thymeleaf: html을 만들어주는 템플릿 엔진

- 설정 완료 후 Generate -> 압축 파일 다운로드
(2) Intellij
만든 파일을 Open
-build.gradle
plugins {
   id 'java'
   id 'org.springframework.boot' version '2.7.7'
   id 'io.spring.dependency-management' version '1.0.15.RELEASE'
}

group = 'mye'
version = '0.0.1-SNAPSHOT'
sourceCompatibility = '11'

repositories {
   mavenCentral()
}

dependencies {
   implementation 'org.springframework.boot:spring-boot-starter-thymeleaf'
   implementation 'org.springframework.boot:spring-boot-starter-web'
   testImplementation 'org.springframework.boot:spring-boot-starter-test'
}

tasks.named('test') {
   useJUnitPlatform()
}

MyeSpringApplication에서 main 함수 실행 > Tomcat started on port(s): 8080 (http) 출력 확인

웹브라우저 > http://localhost:8080 접속 > 에러 페이지 뜨면 성공

IntelliJ IDEA > preferences 접속 > gradle에서 IntelliJ IDEA로 바꿔주기

2. 라이브러리 살펴보기
* 그냥 이런게 있구나 정도만
-Gradle은 의존관계가 있는 라이브러리를 함께 다운로드
(1) 스프링 부트 라이브러리
spring-boot-starter-web
spring-boot-starter-tomcat: 톰캣 (웹서버)
spring-webmvc: 스프링 웹 MVC
spring-boot-starter-thymeleaf: 타임리프 템플릿 엔진(View)
spring-boot-starter(공통): 스프링 부트 + 스프링 코어 + 로깅
-spring-boot
-spring-core
-spring-boot-starter-logging
-logback, slf4j
(2) 테스트 라이브러리
spring-boot-starter-test
-junit: 테스트 프레임워크
-mockito: 목 라이브러리
-assertj: 테스트 코드를 좀 더 편하게 작성하게 도와주는 라이브러리
-spring-test: 스프링 통합 테스트 지원
3. View 환경설정
(1) Welcome Page 만들기
- resources/static 에 index.html 파일생성
<!DOCTYPE HTML>
<html>
<head>
 <title>Hello</title>
 <meta http-equiv="Content-Type" content="text/html; charset=UTF-8" />
</head>
<body>
Hello
<a href="/hello">hello</a>
</body>
</html>
-서버 중단 후 다시 run > http://localhost:8080/ 접속

-스프링 부트가 제공하는 Welcome Page 기능
-static/index.html 을 올려두면 Welcome page 기능을 제공
-spring boot 2.7.7. reference documentation
https://docs.spring.io/spring-boot/docs/2.7.7/reference/html/
Spring Boot Reference Documentation
The reference documentation consists of the following sections: Legal Legal information. Getting Help Resources for getting help. Documentation Overview About the Documentation, First Steps, and more. Getting Started Introducing Spring Boot, System Require
docs.spring.io
-thymeleaf 템플릿 엔진
-thymeleaf 공식 사이트: https://www.thymeleaf.org/
-스프링 공식 튜토리얼: https://spring.io/guides/gs/serving-web-content/
Serving Web Content with Spring MVC
this guide is designed to get you productive as quickly as possible and using the latest Spring project releases and techniques as recommended by the Spring team
spring.io
-main/java/controller 밑에 myeController 파일 생성
package mye.myespring.controller;

import org.springframework.stereotype.Controller;
import org.springframework.ui.Model;
import org.springframework.web.bind.annotation.GetMapping;

@Controller

public class myeController {

    @GetMapping("hello")
    public String hello(Model model){
        model.addAttribute("data", "hello!");
        return "hello";
    }
}
-resources/templates에 hello.html 파일 생성
<!DOCTYPE HTML>
<html xmlns:th="http://www.thymeleaf.org">
<head>
 <title>Hello</title>
 <meta http-equiv="Content-Type" content="text/html; charset=UTF-8" />
</head>
<body>
<p th:text="'안녕하세요. ' + ${data}" >안녕하세요. 손님</p>
</body>
</html>
(2) thymeleaf 템플릿엔진 동작 확인
-서버 재실행
-http://localhost:8080/hello 접속

-동작 환경 그림
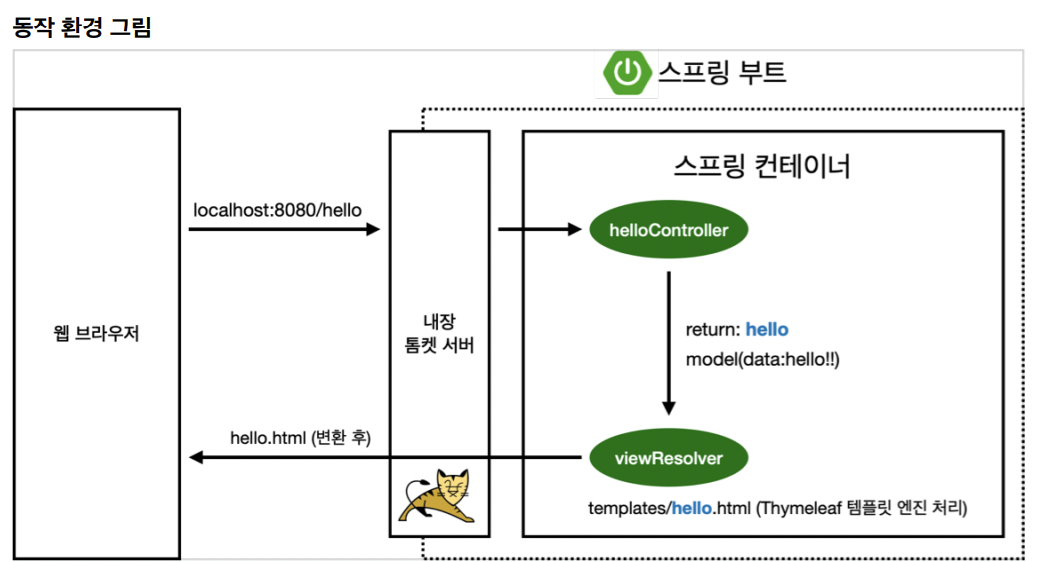
- 컨트롤러에서 리턴 값으로 문자를 반환하면 뷰 리졸버( viewResolver )가 화면을 찾아서 처리
-스프링 부트 템플릿엔진 기본 viewName 매핑
-resources:templates/ +{ViewName}+ .html
(2) 빌드하고 실행하기
-콘솔로 이동
1. ./gradlew build
2. cd build/libs
3. java -jar mye-spring-0.0.1-SNAPSHOT.jar
4. 실행 확인

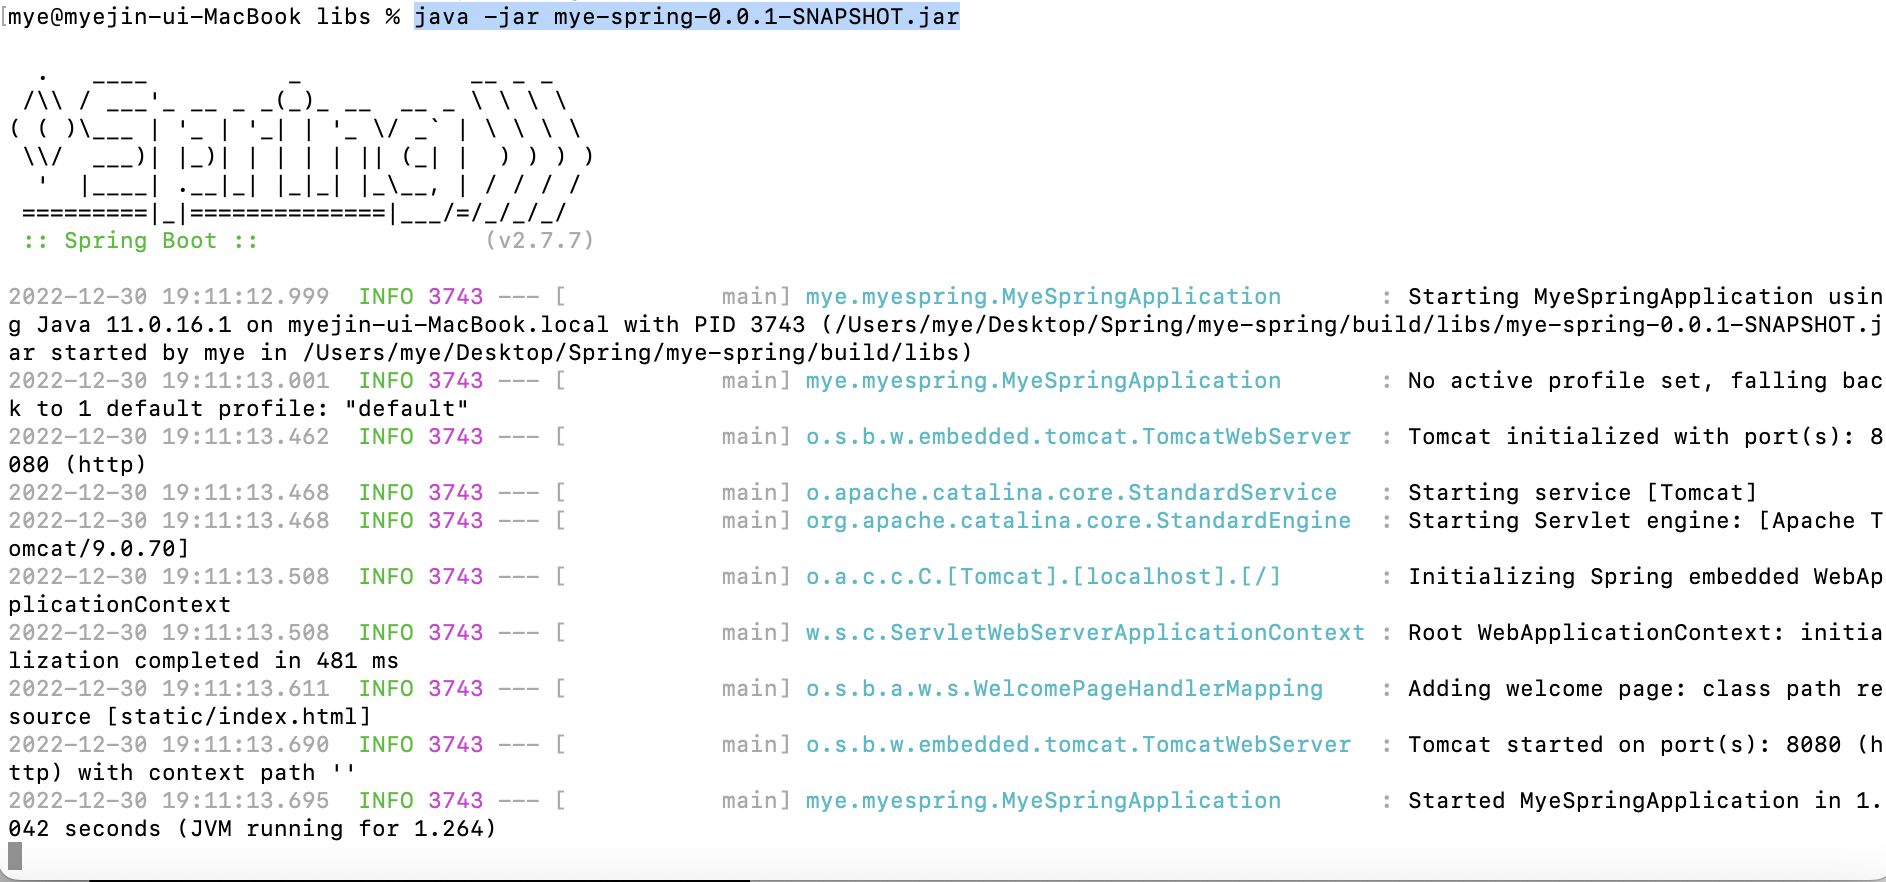
-http://localhost:8080 접속 및 실행결과

-빌드 오류 시 해결법
./gradlew clean build
'Programming Study > Spring' 카테고리의 다른 글
| [Inflearn] 스프링 입문 | 3 회원 관리 예제 - 백엔드 개발 (0) | 2023.01.01 |
|---|---|
| [Inflearn] 스프링 입문 | 2 스프링 웹 개발 기초 (0) | 2023.01.01 |